Onboarding a Device
Onboarding a new devices involves configuring thin-edge.io to connect to a cloud for the first time. This generally involves the following steps:
- Configure the cloud url to connect to
- Generate the device certificate (if it does not already exist)
- Upload the device certificate to the cloud
- Connect the associated tedge-mapper
Onboarding a device to Cumulocity
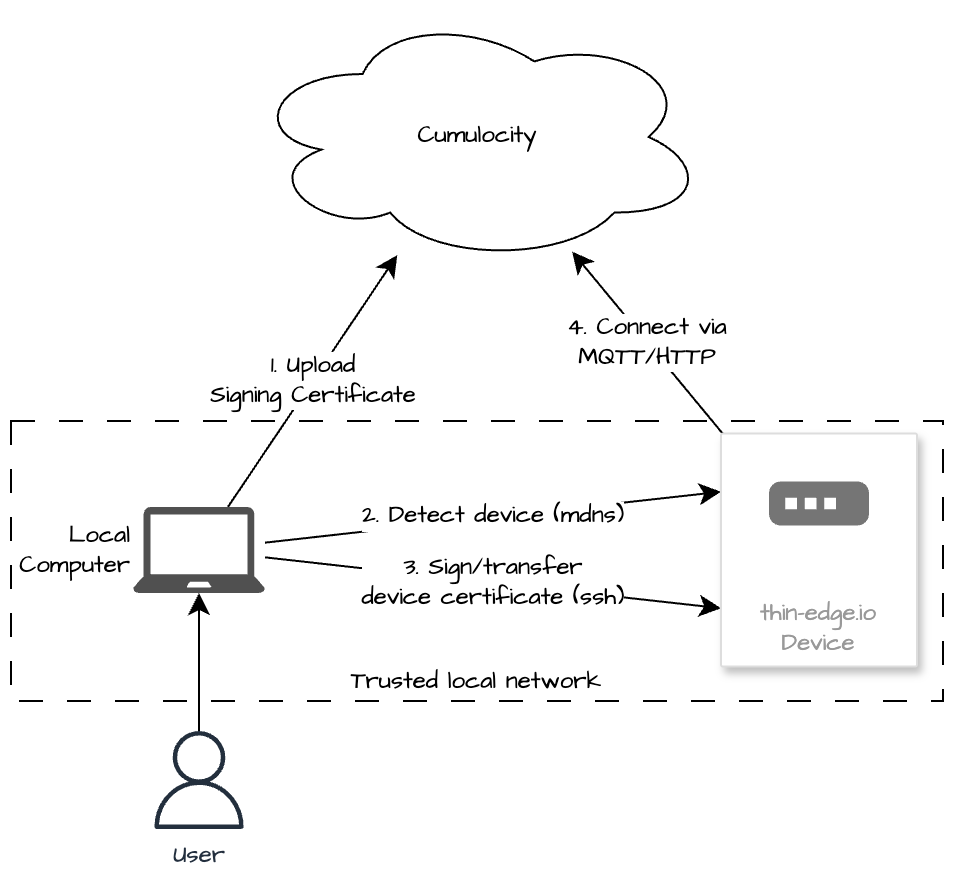
The onboarding described in this section involved onboarding a device by executing remote commands on the device via SSH.
It is a two step process which is described as follows:
- Detect the device (by using DNS Service Discovery)
- Onboard it via ssh commands
Below shows a diagram of the intended setup to perform the onboarding, where both your computer and the device (to onboard) are in the same network, and you can ssh into the device.
Pre-requisites
On your machine (not the target device that will be on-boarded) you will need on of the following:
-
One of the following CLI tools to scan for devices
- avahi-browse
- dns-sd
MacOS Usersdns-sd is installed by default.
-
A valid ssh key which matches the authorized key loaded in the built image
The ssh key on your local machine should be loaded. You can check if your key is loaded into the
ssh-agenton your host by running:ssh-add -lOutput2048 SHA256:abcdef/E1bA+DbVEsw3RoqKEMK9kU /home/powersuser/.ssh/id_rsa (RSA)infoIf you are using an image built using Rugix, the authorized ssh key/s should have been included in the image. If you can't ssh into your device please review the build instructions again to make sure the correct ssh key/s was added during build time.
-
go-c8y-cli extension c8y-tedge
Setting up go-c8y-cli
-
Install go-c8y-cli as per the instructions
-
Install the go-c8y-cli extension, c8y-tedge
c8y extension install thin-edge/c8y-tedgetipIf you have already installed the
c8y-tedgego-c8y-cli extension, then make sure it is up-to-date using:c8y extension update tedge -
Create a Cumulocity session file (if one does not already for the Cumulocity instance you wish to connect to)
c8y sessions create
Procedure
-
Insert the SD Card and power on the device, making sure the ethernet cable is also connected
-
Activate your go-c8y-cli session where you would like to onboard your device to
set-session -
Scan for the device using DNS Service Discovery (DNS-SD)
c8y tedge scanOutputrpi1-b827eb21100e.local
rpi2-b827ebed6e5a.local
rpi3-b827ebe1f7d6.local
rpi4-dcb630486720.local
rpi5-d83add9a145a.local
rpizero-b827ebdddb46.local
rpizero2-d83add030bfd.localinfoThe device may take a few minutes to start and run the initialization tasks, so be patient.
If the device is still not connected after 10 minutes, then double check that the ethernet is connected correctly, and that you are in a network which assigns an automatic IP address via DHCP.
-
Bootstrap the image using the detected device in the previous scan
c8y tedge bootstrap root@rpi5-d83add9a145a.local -
If you have Wi-Fi on your device, then you can also connect to it so that you can remove the ethernet cable
The
ncmlicommand can be issued via ssh to configure and connect the device to a given Wi-Fi network:ssh root@mydevice.local nmcli device wifi connect "<AP name>" password "<password>"Where
<AP name>is the Access Point Name (e.g. SSID) of the network, and the<password>is the password required to connect to the access point.